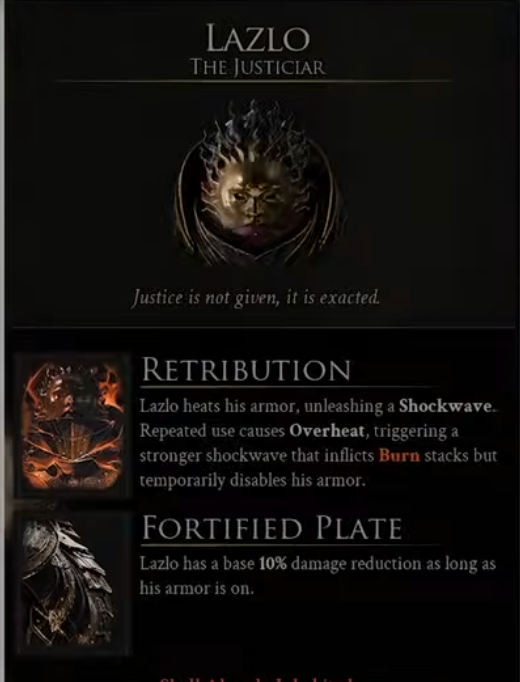
Lazlo is the tankiest shell in Mortal Shell 2 — highest health pool in the game, tons of damage mitigation, and a Heat meter that powers his Retribution shockwave. This guide builds him around maxing Heat for overheat spikes, stacking burn, and going ham with melee while his armor cools down.
Overview
Lazlo is likely the sixth, seventh, or eighth shell you'll get, depending on the route you take in the second region. He's a tanky boy: the highest health pool of any shell, heavy damage mitigation, and he can take a beating and keep ticking. Playing Lazlo is all about managing his Heat cycle — knowing when to fire Retribution, when to hold it, and when to push into the overheat spike.
Lazlo Abilities: Retribution & Heat Mechanic
Retribution
An AoE shockwave that puts burn stacks on enemies, upgraded to deal more damage and break enemies as well. Every use fills his Heat meter. As Heat rises, Lazlo gains bonuses from his passives — more damage, more resolve, more damage reduction. When fully heated, using Retribution fires a devastating overheat shockwave that applies massive burn stacks — but then puts his armor on cooldown for roughly 7–9 seconds, dropping his damage reduction and heat bonuses. The cycle: shockwave, shockwave, shockwave, massive shockwave, vulnerable window, repeat.
Fortified Plate
A flat 10% damage reduction whenever his armor is on — which is most of the time. One of the main reasons Lazlo is so hard to bring down.
Best Weapons for Lazlo
Veteran's Battle Axe (Melee — Best in Slot)
The top pick for this build. Its cleaving R2 moveset (especially the running R2) is clean, and it's the only weapon in the game that can be infused with the burn status effect. That matters: burn stacks from your axe pile right on top of the burn stacks your Retribution shockwave already applies, dealing substantial damage over time. The pairing is a core reason this build works.
Sidearm / Ranged
You can use any sidearm you like — resolve goes into Retribution here, not into sidearm skills. The weapon skill on the Veteran's Battle Axe throws the axe as a ranged attack when you genuinely need reach, but the build doesn't depend on it.
Recommended Tarstones
Weapon Stones
- Thief Stone — gain 5 Warp stacks every swing. Combined with the 20 stacks from Rush as armor goes on cooldown, you hit the 30-stack cap almost instantly for a massive attack speed boost.
- Inflamed Claw Stone — puts burn infusion on the Veteran's Battle Axe (the only weapon that can take it). Upgrade to permanent infusion as fast as you can — this is your #1 tar core priority.
- Lost Clot Stone — throw your melee weapon at the target for AoE damage: a solid ranged option that also counts as a melee attack (can revive you if you get knocked out of your shell).
Support Stones (Melee-Focused)
- Auspicious Stone — melee crit chance.
- Headsman Stone — melee crit damage.
- Bullwork Stone — damage reduction from defeating enemies. Stacks with your Heat-based damage reduction to get very tanky.
- Berserker Stone — up to 65% more melee damage as your health drops. Works great because Lazlo tanks hits so well and has the biggest health pool in the game.
Ranged stones are a free slot — pick whatever fits your sidearm. Common Moonshine as a passive item adds even more damage reduction: with full Heat you can reach ~34% damage reduction, a genuinely insane amount of damage reduction.
Lazlo FAQ
What is the best Lazlo build in Mortal Shell 2?
The Heat Tank build: keep your Heat meter maxed with Retribution for up to 30% damage reduction, use the overheat shockwave for massive AoE burn damage, then go ham with melee while armor is on cooldown using Veteran's Battle Axe and melee crit Tarstones.
How does Lazlo's Heat mechanic work in Mortal Shell 2?
Using Retribution heats Lazlo up. At max Heat, Warmed Up grants +30% damage, +35% resolve gain, and +10% damage reduction. Using Retribution at full Heat triggers an overheat shockwave — devastating damage and burn stacks — but puts his armor on a 7–9 second cooldown, during which he loses his damage reduction.
What is the best weapon for Lazlo in Mortal Shell 2?
The Veteran's Battle Axe is the only weapon that can be infused with the burn status effect (via the Inflamed Claw Stone). Its R2 cleaving moveset and running R2 are strong, and the burn stacks it applies pile on top of the burn stacks your Retribution shockwave already puts on enemies — the pair is the core of this build.
What Tarstones should I use for the Lazlo build in Mortal Shell 2?
Thief Stone for Warp stacks on strike (hit the 30-stack cap almost instantly), Inflamed Claw Stone for permanent burn infusion — prioritize this upgrade above everything else — and Lost Clot Stone for a ranged throw that counts as melee. Support: Auspicious Stone for crit chance, Headsman Stone for crit damage, Bullwork Stone for damage reduction on kill, and Berserker Stone for up to 65% more melee damage as your health drops.